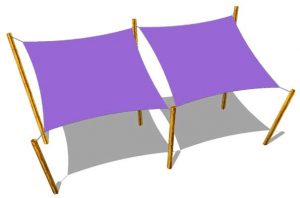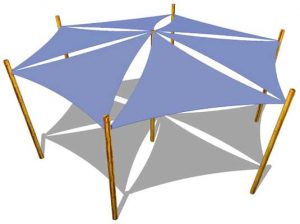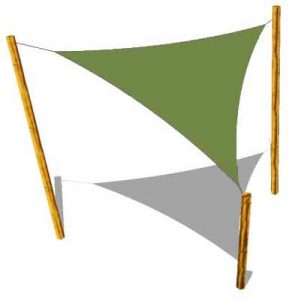


Sunshade sails can be placed in a variety of ways:
Horizontally, where all corners are at the same height;
Vertically, like a privacy fence;
Slants & Angles with overlapping sails;
Or, where some corners are high and some low.
You probably already have an idea of what you want to cover or what you want to design. If you haven't decided yet, here are some ideas for a single or multiple design look.


A horizontal sail can be boring to look at, while a totally vertical sail could catch more wind and could produce heavier loads.
The most visually appealing situation is when two or more shade sails are used and the mounting elevations of the sails change dramatically from corner to corner.
Setting mounting points 3ft or more change in height makes for a visually stunning look.
Prior to installation, check with local authorities for any relevant building regulations which may exist, and check with the local utility companies for any underground services prior to digging holes for the support posts.
Before you commence installation, it is very important that you consider the most suitable location for your shade sails. Take into account the following:
Size of the shade sail(s);
Strength of existing structures intended to be anchor points;
Ability to insert suitable fixing posts;
Location of barbecue grills, fire pits, and other high heat sources;
Sun direction and path tracking;
Wind speeds are typical and maximum expected for your area.
Find a suitable anchor point for each corner of the shade sail, such as those listed below. These need to be strong enough to take the strain of the shade sail material when tensioned.
Anchor points could be:
A wall or strong beam
A suitable tree
A wooden post at least 100mm in diameter is set in the ground.
A metal pole at least 48mm in diameter is set in the ground.
A metal pole at least 48mm diameter fitted into a sleeve in the ground, like a rotary washing line.
Fixing points should be at least 7ft 10inches above the ground, and it is extremely important that these are sufficiently strong to take the full weight of the shade sail in windy conditions.
The wind can add significantly to the stress of the shade sail on any fixings, so it is vital to be certain that they can stand the additional drag.
NB: If you have any doubts you should take advice from a builder or structural engineer.
Posts
If you need to install posts, these should be 48mm wide galvanized steel which is 4mm thick (these can be easily painted if required).

Posts should be angled away from the center of the shade sail by at least 10 degrees to provide additional strength and stability.

Footings
Footings for posts for shade sails up to 16ft 5inches should be 400mm square and 800mm deep and this should increase to 400mm x 1200mm for larger sizes.
Foundations
Concrete
Concrete should be well packed down around the post and sloping slightly outwards at the top to ensure water does not collect around the post. This should be left for a minimum of 48 hours to allow it to set completely before you attach the shade sail. We do not recommend the use of rapid-set concrete.
1. Firm ground
Lay a 100mm depth of 20mm gravel at the base of the post. Add concrete and brace post on the angle.
2. Soft ground
Pour a 100mm depth of concrete at the bottom of the hole to provide a solid pad. Allow this to set. Add the gravel at the base of the post. Add concrete and brace post on the angle.
Wall
Once you have decided on a suitable site, the shade sail should be laid out in position on the ground allowing an additional 10% at each corner for tensioning.
For larger gaps, you may require stainless steel cable or similar to reach more distant fixing points.
Trees
If you decide to use a tree as a fixed point, it should be at least 250mm in diameter.
Some possible combinations of fixing accessories


Connecting the sail shade
Connect fixing accessories to your mounting points as required. Ensure all accessories face towards the middle of the sail and are tightly secured.

Tensioning
To connect your sail shade you should first attach the adjustable fixings to the mounting points(ensuring they face the center of the sail shade), and then attach the sail shade to these, using a strapping tensioner to stretch the sail shade as tightly as possible, replacing this with a turnbuckle for final tensioning and adjustment.

Please browse our shade sail hardware selection below,
Important: at least two of the sail's fixing accessories must be tensioning devices.
A rope or chain can be used to extend your shade sail to a fixing point if required. Select the fixing accessories that best suit your own installation.

Turnbuckle: To attach the shade sail corner ring to a fixing point and provide tension on the shade sail.

Shackle: Use to link shade sail corner to pad eye or eye bolt.

Pad eye: To attach shade sail corner ring to a wall in conjunction with D shackle.

S hook: Use to link shade sail corner to pay eye or eye bolt.

Eye bolt: To attach shade sail corner ring through a thimber stud, steel pole or slid support.

Snap hook: Used to link shade sail corner to pad eye or for temporary use.

Terminals: We offer a range of terminals that are safe, reliable, and do not require any specialized swaging or crimping tools.

Rigging screws: Rigging screws are designed to conceal the threads within the pipe for a better, more streamlined appearance to your shade sail rigging, designed to attach to a wide range of stainless steel fixtures and fittings, such as screw eyes and eye bolts.

Shade Sail Hardware Kit :
Triangle type set includes:2 x Turn Buckles,3 x Pad Eyes,3 x Carabiner,12 x Screws for fixing eye plates;
Square type set includes:2 x Turn Buckles,4 x Pad Eyes,2 x carabiners, and 16 x Screws for fixing eye plates.
If you need help determining the right assembly or size for your application, e-mail our specialists at sales@lg-lifting.com for assistance.


